
Shader FX and Processor
In HLSL, // @header(Lighting) before a parameter adds a bold section heading, without a foldout. The title needs no quotes; the heading is preserved when saving presets.
The one curve default is flat at 1, with keys at times 0 and 1.
Curve defaults also include easeIn for a slow start and easeOut for a slow finish. Both are quadratic 0→1 curves.
Effect authors can choose curve _Profile = linear or curve _Profile = easeInOut in a // @param declaration. Both start at (0,0) and end at (1,1); Ease In Out smoothly flattens at both ends.
Color → Levels offers a Curve after input black/white and Gamma, before output black/white. It starts linear. With Preserve Color, the curve remaps luminance; otherwise it remaps each RGB channel separately. Alpha is unchanged.
Texture source Self reads the image before the current FX, including earlier effects. None returns transparent pixels. These modes need no assigned asset or layer; Self continues to work when copied to another layer.
Vector parameters provide two, three or four numeric components. A normal parameter provides a unit direction and Edit on Canvas. Drag its endpoint: near the center it faces the camera; at the maximum radius it points along the canvas. Click the endpoint to switch between + (toward the camera) and − (away).
A texture parameter can use Texture (an asset) or Layer (a layer in this document). Choose the source mode or drag a layer onto the parameter. Procedural and Drawing layers are supported, even when hidden. Groups provide their colored contents; hidden children remain hidden. Missing sources produce transparency, and circular references cannot be selected.
Procedural shapes written in an FX can follow the layer transform using LayerToLocal(uv). See the shader authoring reference for the coordinate contract.
Use a custom shader effect when you need a look that the built-in layers do not provide. You can use an existing effect and adjust its parameters without writing code.
Profile in Bevel Emboss maps the selected height channel to relief height. Mapping in Gradient Map redistributes brightness before choosing a gradient color. Both curves start linear.
Color Balance uses three signed RGB components. Gain, Levels, Threshold, ambient lighting and distortion offsets offer soft limits where appropriate. Levels and Threshold can work above 1 for HDR; blend amounts remain limited to 0–1. Pixelate and Posterize allow more than 64 levels and Gamma above 5 through numeric input.
The unlabeled checkbox in each Shader FX header enables or bypasses that effect without removing its settings. External FX references share this state; use Embed for an independent copy.
Apply an existing effect
- Select the layer you want to change.
- Use + Preset ▾ in its FX section and choose an effect by category.
- Adjust its sliders, colors, textures, toggles and dropdowns. Changes appear immediately.
An effect can offer a slider and a dropdown for the same setting: changing either updates the shared value. Custom means the current number is not one of the dropdown’s predefined choices.
Hover over a parameter to read its description, if the effect’s author supplied one.
Some sliders allow numbers past one or both ends of their visible range: type in the adjacent field or drag the parameter label. Each end can independently be a hard or soft limit. The thumb stays at the nearest endpoint, but the effect uses your number. Other sliders keep both dragging and numeric input limited to their range, as chosen by the effect’s author.
Effects can offer a curve field for adjusting a numeric profile. Click it to edit keys and tangents with Unity’s curve editor. It starts as a straight line from 0 to 1; values may go below 0 or above 1. Saving an HLSL preset preserves the edited curve.
Effects can also offer a gradient field. Click its strip to edit colors, transparency and interpolation, including HDR colors. New gradients start black-to-white; changes update the effect immediately.
Alternatively, drag a WhimTex effect .hlsl from Project onto a row in Layers.
Dropping it onto the preview or empty space in the list creates a Shader Processor at the top of the composition.
HLSL brush presets and files without the effect marker are not accepted.
If a preset contains invalid code or parameters, selecting it reports an error in Console and leaves the layer unchanged.
Each catalog effect has its own settings. The included Color → Gain adjusts brightness and tint; Transform → UV Transform repositions the incoming image within a visible frame. Everything outside the frame is transparent, so moving the image clips it at the frame. Distortion effects do not have this clipping. Effects added to the project become available automatically; no preset folder setup is needed.
+ Reference selects a Shader FX asset whose settings are shared everywhere it is used.
⋮ → Embed Copy in the effect header creates an independent copy in the document without changing the external asset. The same menu contains Move Up, Move Down and Remove.
Project HLSL effects receive code changes from their source .hlsl file.
To edit the code independently in the document, click Embed Copy under Code. Parameters are visible directly below the header; Code contains the editor, Apply, Save Preset… and the nested Shader inputs reference. Diagnostics appear only when there is something to report.
Effect order matters: the ↑ and ↓ arrows on each effect row apply it earlier or later in the sequence.
HSV correction
Color → HSV adjusts hue, saturation and brightness. Hue shifts the hue in degrees; Saturation and Value are multipliers: 1 is neutral, 0 removes saturation or makes the image black. Amount mixes the correction with the original. Gray pixels stay gray when changing hue or saturation. Alpha is preserved and HDR brightness is supported. HSV correction treats negative RGB channels as zero; neutral settings and Amount 0 leave the original unchanged.
Gradient mapping
Color → Gradient Map recolors shadows, midtones and highlights using a gradient. Click Gradient to choose colors, use Amount to mix with the original image and Reverse to swap the mapping direction. Input brightness outside 0..1 uses the endpoint colors. The original alpha is preserved; gradient alpha is ignored.
Pixelation and dithering
Pixel Art → Pixelate replaces every block of Pixel Size canvas pixels with a single value. Average samples a 4×4 grid inside the block instead of its center, so thin details survive. Levels sets how many values each channel keeps and Gamma moves the tonal steps between shadows and highlights. Dither picks the pattern that spreads the error between levels: Bayer2, Bayer4 and Bayer8 give the classic ordered look, Interleaved is irregular noise, Checker is a two-tone grid, Halftone builds a clustered-dot screen and Hash is stable noise without a visible grid. The pattern is evaluated per block, so it stays visible after pixelation. Amount weakens it down to plain rounding. One Bit reduces the result to Low Color and High Color by luminance instead of quantizing each channel. Alpha is preserved. The same pattern list works per pixel in Color → Posterize.
Lighting and embossing
- Normal Map → Lighting turns an RGB normal map into a shaded surface. Normals defaults to Self. Set Light Direction with its canvas handle, then adjust Base Color, light/shadow colors, Intensity and Ambient. Keep Packed Color enabled for the Normal Map layer’s default output; disable it for Linear Data. Flip Y reverses the green-axis convention. Platform-packed normal textures are not supported.
- Lighting → Bevel Emboss derives normals from Height Map (Self by default, or another layer). Height Channel selects luminance, R, G, B or Alpha; Profile maps height, Depth raises or engraves, and Smoothing sets the sampling radius in document pixels. For SDF, the visible gradient and distance ranges define bevel width.
Both effects use Base Color alpha to blend transparent lighting (0) into the filled, shaded surface (1). Intermediate values crossfade with alpha-aware mixing. RGB tints the surface; Ambient fades in with it. Output selects Both, Highlight Only or Shadow Only for the transparent component and has no effect at Base Color alpha = 1. Light Color/Shadow Color alpha controls that component’s strength. Overall opacity and blending belong to the layer. Both effects default to Base Color alpha 0. Re-add the preset to update an older embedded copy.
Normal map normalization
Normal Map → Normalize restores unit-length normals while preserving alpha.
Use it after processing an RGB normal map if its vectors have changed length.
Neutral (0.5, 0.5, 1) stays unchanged; an undefined direction becomes neutral.
Keep Packed Color enabled for the Normal Map layer’s default encoding; disable it for Linear Data.
This toggle accounts for color encoding, but does not unpack platform-specific normal-map formats.
Save your own preset
In the effect’s code editor, click Save HLSL Preset…. This creates an .hlsl file
with the current parameter values as defaults, including colors and Transform 2D.
The file name becomes the preset name. You can save in the user library’s ShaderFX
subfolder or anywhere under the project’s Assets folder. Overwriting keeps a .bak copy.
Set the shared library location in User Settings → Presets → Presets Folder. Its Brushes and ShaderFX subfolders hold the two kinds of presets. You can also place existing HLSL presets in ShaderFX or its subfolders; reopen + Preset to see them under User. User presets are copied into the document; later changes to their files do not change effects you have already added. Presets saved under the project’s Assets remain linked to their files: editing a file updates all effects using it.
Texture defaults are references, not embedded images. To use them in another project,
also transfer the referenced texture assets with their .meta files, or assign replacements.
Edited gradient keys are saved in the document, but not in an exported HLSL preset yet. A new instance of that preset starts with a black-to-white gradient.
Adjust an effect on the canvas
Effects with a Transform 2D parameter offer Edit on Canvas. Select it to show a green frame, then move, resize or rotate the frame. Rotation is around its center; there is no pivot control. Use Ctrl/Cmd + corner to distort, Ctrl/Cmd + edge to skew, or Ctrl/Cmd + Alt + Shift + corner for paired perspective adjustment. Alt with Ctrl/Cmd moves the opposite corner symmetrically. Position, Size and Rotation preserve the deformation; Reset Transform removes it. Click the button again or switch tools to leave this mode. Escape cancels the current drag.
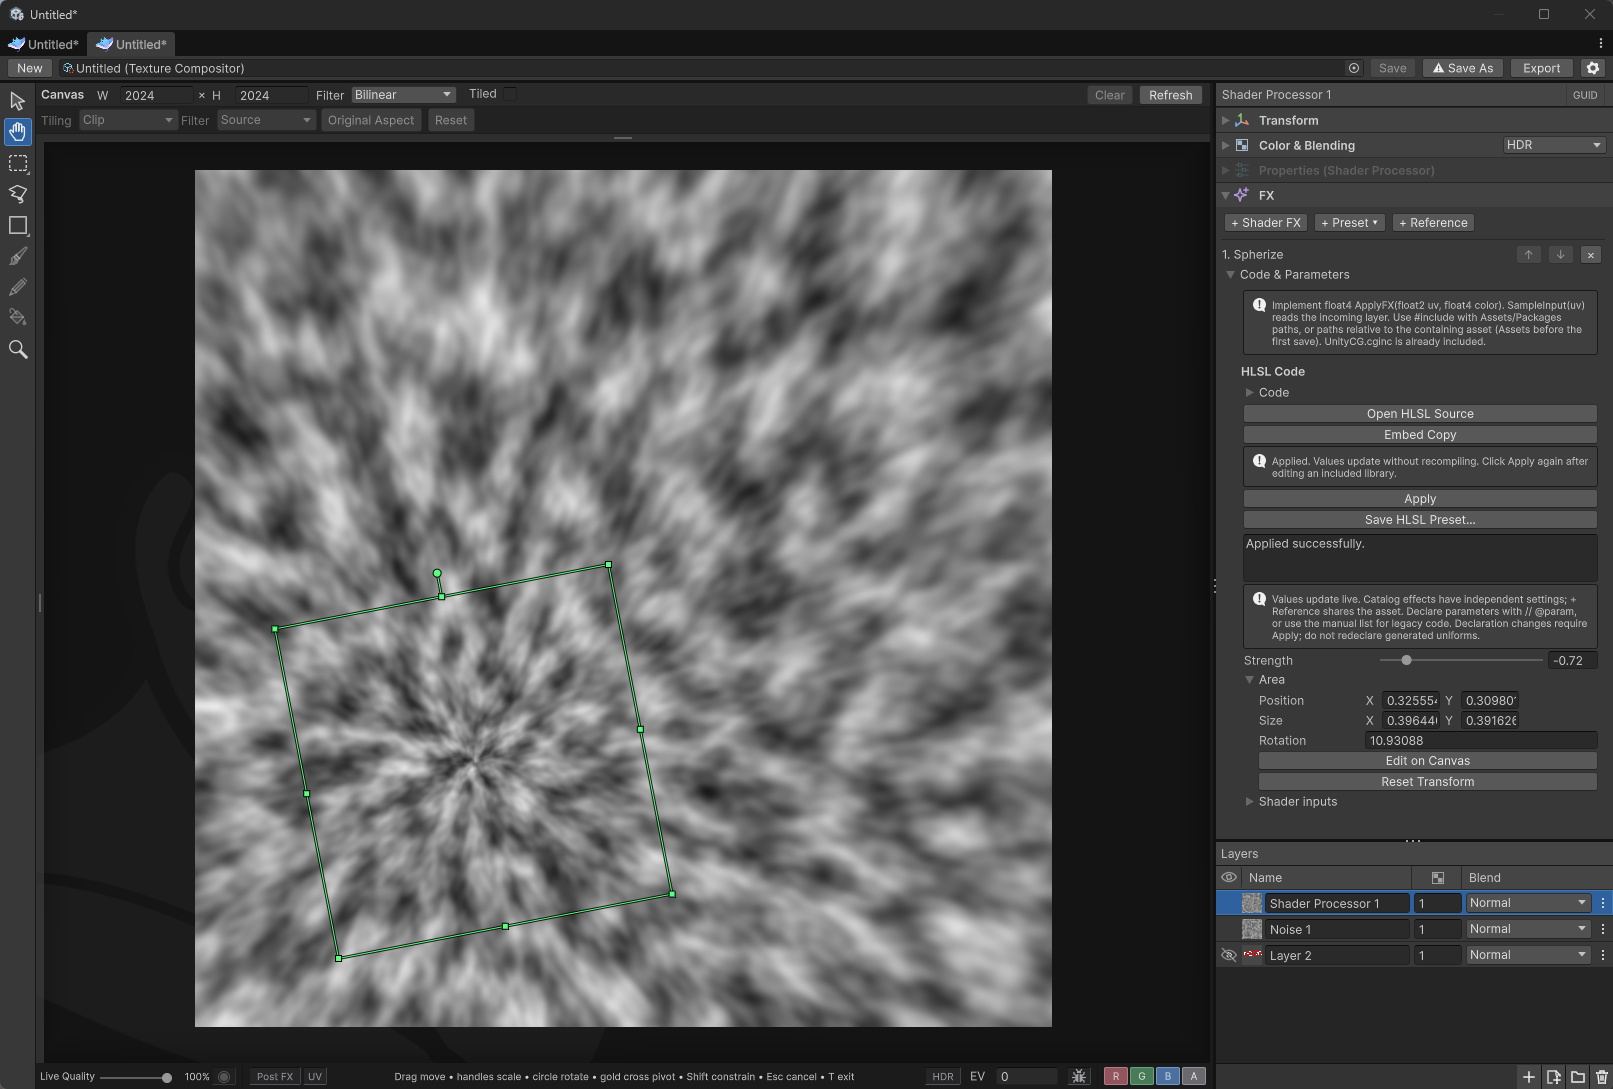
The frame edits the effect, not the layer transform. Its purpose depends on the effect: it may place an image, change a pattern’s scale, or define a local area. It is not automatically a mask, but UV Transform leaves pixels outside the frame transparent.
Distortion presets
Choose FX → + Preset → Distortion → Spherize or Twirl.
- Spherize / Strength: positive values expand the center; negative values pinch it. Zero leaves the image unchanged.
- Twirl / Angle: twists around the center; the sign reverses direction. The angle is measured in degrees at the frame’s local radius 1 and grows with distance.
- Area / Edit on Canvas: move, resize or rotate the green coordinate frame. Stretch it to make the distortion elliptical.
Distortion effects—Spherize, Twirl and Polar Coordinates—do not mask or fade at the frame’s edge. Distortion continues outside it. Strong settings can reveal areas beyond the input image, where its edge pixels are extended. RGB and alpha are distorted together.
Polar coordinates
Distortion → Polar Coordinates contains two effects:
- To Polar wraps a strip into a circle: horizontal runs around the center, vertical runs outward.
- From Polar unwraps a circle into a strip: left to right covers one full turn, bottom to top covers distance from the center.
Area / Edit on Canvas positions and shapes the circle: the output circle for To Polar, or the source circle for From Polar. Angle Offset shifts the start of the turn in degrees; zero starts to the right of the center and runs counterclockwise. Radial Offset shifts the starting radius: positive values move the pattern outward in To Polar, or start sampling farther from the center in From Polar. One unit reaches from the center to the frame edge along its axes.
Radius continues beyond the frame without a fade. Match the left and right edges of the source strip to avoid a visible seam around the circle. The entire strip width converges at the center, so unwrapping cannot recover details lost at that point.
Affect one layer or the image below?
Shader FX belongs to one layer and changes that layer’s image.
A Shader Processor is a separate layer that changes the combined image below it. Place it above the layers you want to process. Use Normal blending and lower Opacity to mix the effect with the original; hide the Processor to compare before and after.
In a Pass Through group, a Processor can also affect the background beneath the group. Use an isolated group if the effect should stay within that group’s contents.
Unlike Post FX preview, both are included in the saved image.
Create your own effect
If you have shader code, use + Shader FX, paste it into the editor and click Apply. The code and settings stay with the document; no separate file is required. If the code contains an error, the previous working version stays visible.
Custom HLSL effects and brushes can use the built-in noise library for grain, organic masks and distortion. See the noise functions and example.
Writing an effect is optional. The shader authoring reference is for creating code and reusable libraries.