
Brush, Pencil and Fill
Select a Drawing layer and paint directly on the canvas.
Choose Brush (B) for soft strokes or Pencil (P) for crisp pixels.
If you try to paint on another layer type, the editor offers to convert it first.
Shape the stroke
| Control | What it changes |
|---|---|
| Size | Stroke width. You can drag the label or use [ / ]. |
| Hardness / Gradient | Next to Size in the preview header. Drag Hardness or type a percentage; click the gradient strip to edit it. The arrow switches procedural brushes between Hardness and Gradient without losing either setting. |
| Opacity | Maximum strength of a whole stroke. Release and paint again to build another coat. |
| Flow | Strength of each brush stamp. Lower values let overlapping stamps build color gradually. |
For example, Opacity 40% keeps one stroke at no more than 40%, even when you go over it repeatedly. Flow 10% builds up gently as you draw, up to the Opacity limit. These controls also work when erasing with Brush.
For a textured brush, enable SDF in Brushes → Tip to use the Gradient control. Without SDF, the texture defines its own edge and this header block is inactive. The same controls are also available in Brushes → Tip as Mode, Hardness and Gradient. Changes in either place stay in sync.
Pencil has no hardness or spacing controls. Choose Circle, Square or Diamond for its tip. Zoom in to see its exact pixel outline.
Customize the brush
In Brushes → Tip → Source, choose Standard or HLSL. Standard is a round procedural brush when Texture is empty; assign an image to use a textured tip. HLSL generates its tip with a script and uses the same Tip Channel, SDF/Gradient, rotation and flip controls as a textured Standard brush. Choose HLSL Presets or open Edit Code…, edit the script and press Apply. Tip Resolution controls the detail of the generated tip; Size controls its stamp size. The code window can save an HLSL preset to the project or the user preset folder. Files in the project and in the user folder’s Brushes/HLSL subfolder appear in the menu. The regular brush Save As… also keeps the HLSL code and settings.
A browser AI can provide brush JSON: paste it with Ctrl+V outside a text field to replace the current brush without changing layers. See the brush contract and examples.
With Brush selected, open the upper arrow on the right edge of the preview to show Brushes. It shares the drawer with Post FX: opening one closes the other.
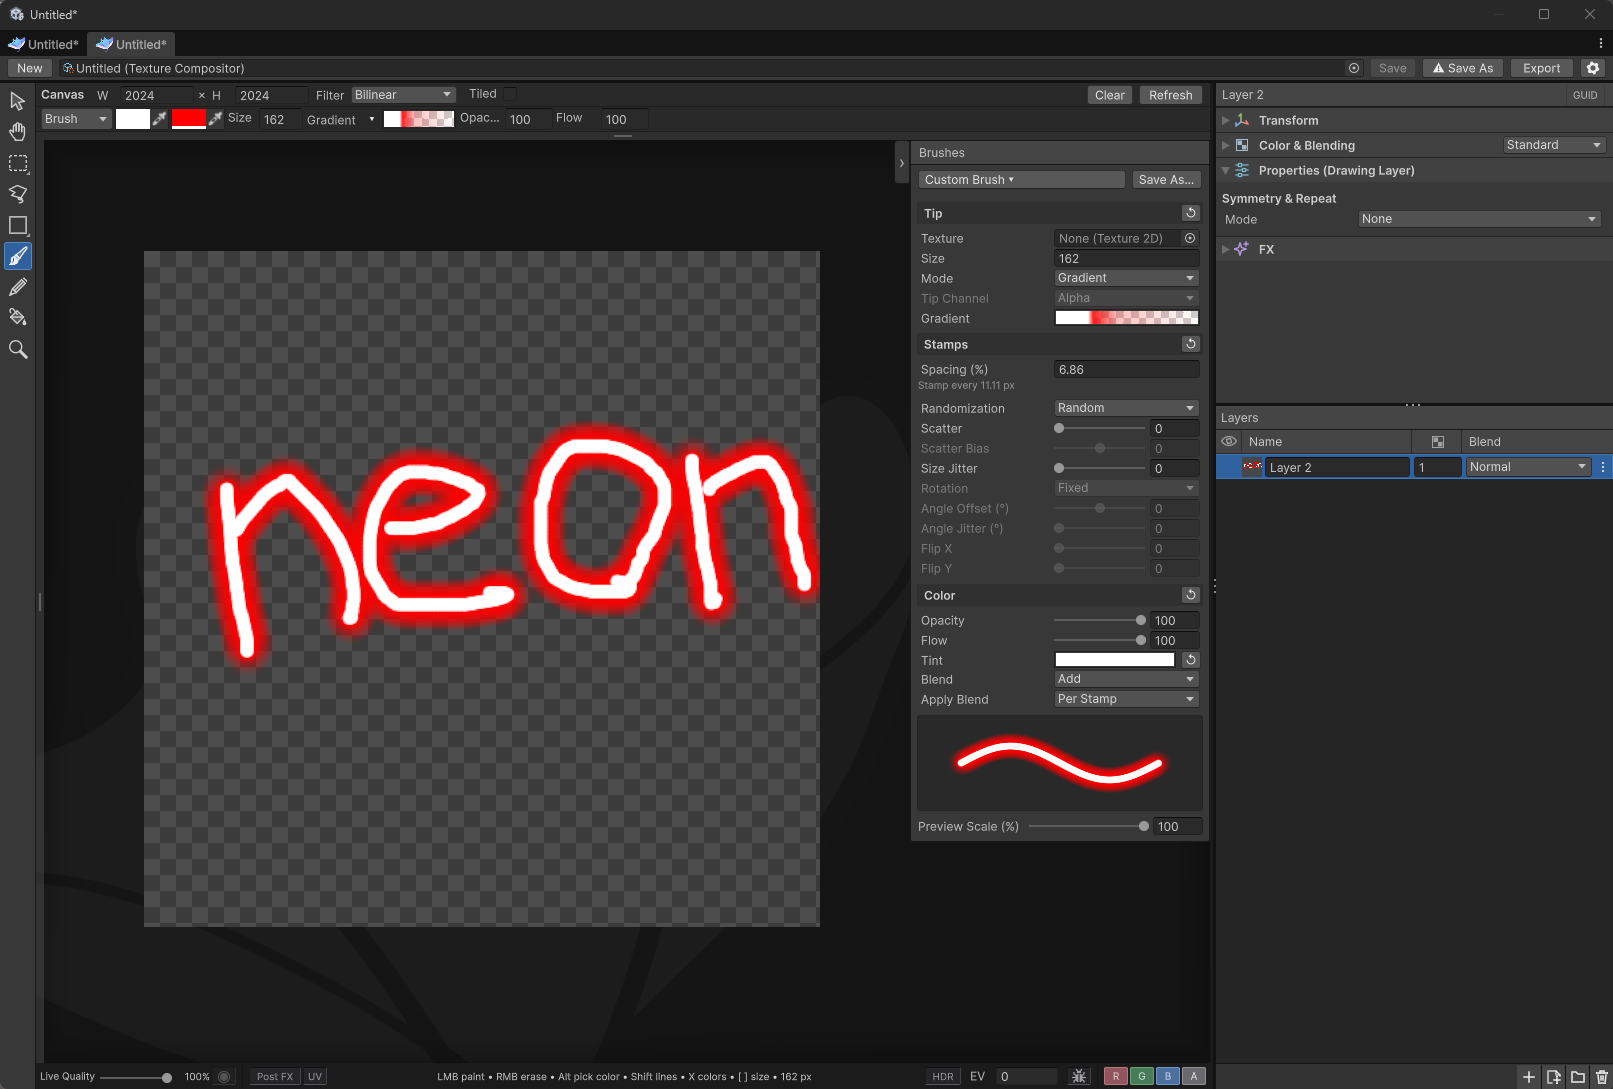
All brush preset controls are available here: Size is in Tip, and Opacity / Flow are in Color. The preview header provides shortcuts to the same settings.
The wavy stroke at the bottom previews your current brush as you adjust it. Large tips are scaled down to fit; Eraser shows its effect on gray paint. The sample does not include the selected layer’s effects or symmetry. Scatter spreads the stamps without shrinking them; wide scatter may extend beyond the sample’s edges. Use Preview Scale (%) below the sample to manually shrink it and fit more scatter. This changes only the sample, not the brush size you paint with.
Use ↺ in the Tip, Stamps or Color header to reset that section, preserving Size, Hardness, Spacing, Opacity and Flow. The Hardness/Gradient mode can still change. Palette colors are not reset. The small button beside Tint resets only its gradient to opaque white, which leaves the brush color unchanged.
| Setting | What it changes |
|---|---|
| Spacing (%) | Distance between stamps, measured against Size. 100% is one diameter; lower values make a continuous stroke, higher values leave separate marks. |
| Scatter | Random displacement around the stroke. 100% spreads centers by up to one brush diameter. |
| Scatter Bias | Negative values concentrate stamps near the stroke; positive values move them toward the outer edge of the scatter disk. 0 keeps the distribution uniform across its area. Available when Scatter is above zero; works with Random and Sobol. |
| Randomization | Random (default) gives ordinary random variation. Sobol distributes variation more evenly across stamps. Applies to Scatter, Size Jitter, Angle Jitter, Flip X/Y and Tint. |
| Size Jitter | Random variation around Size. 50% gives stamps from half to one-and-a-half times the chosen size. |
| Rotation | Fixed keeps the texture tip’s original orientation. Stroke Direction turns it along the stroke, with the tip’s right-facing axis following movement. The first click uses the original orientation until you move. |
| Angle Offset (°) | Constant turn from −180° to 180°, added after Rotation. For example, 90° in Stroke Direction turns the tip across the stroke. Requires a texture tip. |
| Angle Jitter (°) | Random turn added after Rotation and Angle Offset. 0° adds no variation, 180° covers every direction. Requires a texture tip; a procedural brush is unchanged by rotation. |
| Flip X / Flip Y | Chance to mirror each texture stamp horizontally or vertically: 0 never, 0.5 roughly half, 1 always. Axes follow the tip’s rotation. Requires a texture tip; each axis is sampled separately. |
| Texture | Drag in a texture to use its shape as a brush. Clear the field to return to the procedural brush. Size measures its longest side. |
| Tip Channel | Alpha uses transparency; Luminance uses white as ink; Inverted Luminance uses black as ink. Color keeps the tip’s color, multiplied by the painting color. All modes respect the tip’s alpha. |
| SDF | Treat the texture as a distance field and map it through Gradient. Use Alpha for a field in transparency, Luminance for a grayscale field, or Inverted Luminance when dark areas are inside. Color uses the alpha field while keeping the tip’s RGB color. |
| Gradient (preview header) | Left is the interior (0), right is the outer edge (1). Alpha keys control the edge and coverage; color keys multiply the brush color and Tint. Move alpha keys closer for a sharp edge or apart for softness. Shift the transition right to expand the shape, left to shrink it. |
| Tint | Different gradient color or alpha keys produce a random tint per stamp, multiplied by the palette color. Identical keys give a constant tint. The small ↺ button on the right resets to opaque white, which leaves the palette color unchanged. |
| Blend | How paint combines with existing pixels on the active layer. Independent of the layer’s Blend setting; ignored when erasing. |
| Apply Blend | Per Stroke (default) applies Blend to the complete stroke. Per Stamp applies it to every stamp, including where stamps overlap within the same stroke. Opacity controls the whole result; Flow controls each stamp. With dense Spacing, Per Stamp can be slower. |
For scattered colored marks, increase Spacing and Scatter, add a little Size Jitter, then add different colors to the Tint gradient. Start with white in the palette to see the gradient’s colors without an additional color tint.
These advanced settings belong to Brush, not Pencil or Fill.
For a procedural brush, the gradient runs from 0 at the circular tip’s center to 1 at its outer edge. Assigning a texture preserves the selected procedural brush mode.
For a textured SDF brush, enable SDF in Tip, choose the channel containing the distance field, then edit Gradient in the preview header while watching the sample. Start with white color keys to keep the brush color, and use the alpha keys to shape the edge. You can add transparent bands for hollow shapes or color bands for a multicolored tip. The field should use the 0–1 range, with higher values inside (or choose Inverted Luminance). Keep SDF off for ordinary image tips. Gradient is included when saving a brush preset.
Brush presets
Project .sebrush files appear as brush assets with stroke thumbnails in the Project window.
Select one to see a larger preview in the Inspector. Drag the asset anywhere into WhimTex to choose the brush, or use the brush preset menu. Dropping a brush does not create a layer or switch tools.
Choose a saved brush from the selector at the top of Brushes. Use Save As… to name a new preset; the selector menu also offers Overwrite Selected… and Open Brushes Folder. An asterisk means you have changed the brush since saving or selecting it. Changes are not saved automatically.
Presets include Size, Hardness, procedural Mode, Gradient, Spacing, Opacity, Flow, texture tip, Stamps and Color settings. Your palette colors, Brush/Eraser mode, Pencil/Fill settings and layer symmetry stay unchanged. The preview updates when you select a preset.
In Window tab ⋮ → User Settings… → Presets, choose Presets Folder with …
or enter an absolute path. The folder setting is shared across projects on this computer
for your user account. ↺ restores the default location without deleting files.
Brushes are stored in its Brushes subfolder. Each .sebrush file includes its texture
tip, so you can copy it to another computer’s Brushes folder without importing the original
texture. Overwriting keeps the previous file as .sebrush.bak; to restore it, rename that
backup to a different name ending in .sebrush.
The selector also finds .sebrush files anywhere in the project’s Assets or installed
packages. Use Save to Project… in the selector menu, or copy a preset into an Assets
folder to share it with the project. User and Project keep the two sources distinct;
subfolders are supported. Presets supplied by packages can be used, but save your changes
as a new user or project preset.
Color and erasing
The first color swatch is the painting color; X swaps the two swatches.
Hold Alt in WhimTex to use the screen eyedropper; the outlined center pixel in its magnifier is the color you’ll pick.
Click or drag with the left mouse button to pick, then release Alt to return to your tool.
You can sample across the screen, including other Unity windows and other applications. The eyedropper picks the visible color,
including Post FX, EV and the transparency checkerboard, rather than the original HDR value. Brush alpha stays unchanged.
With Brush or Pencil, hold the right mouse button to erase, or choose erasing in the tool options.
Brush and fill settings follow you between layers. Symmetry is set separately for each Drawing layer.
Draw straight lines
Click and begin dragging, then hold Shift to draw horizontally or vertically.
These directions follow the screen, even when the canvas view is rotated.
If the stroke starts snapped to a guide, Shift follows that guide instead, at any angle and regardless of the pointer’s distance from it.
To connect points, click the first point, then hold Shift and click the next one.
Repeat to draw a chain of straight segments.
Fill an area
Choose Fill (G) and click the area you want to color.
| Option | When to use it |
|---|---|
| All Layers | Follow outlines in the whole visible image while filling only the active Drawing layer. Leave off to use that layer alone. |
| Contiguous | Leave on to fill just the connected area you clicked. Turn off to replace matching colors throughout the layer. |
| Tolerance | Increase it to include more similar colors; reduce it if the fill spreads too far. |
| Antialias | Soften the filled edge. |
| Expand (px) | Extend the fill slightly under an outline to close thin gaps. |
Fill does not repeat through brush symmetry. To fill transformed copies outside the layer’s original area, first use Convert to Drawing → Apply Transform.
Use an area selection to keep painting or filling inside a chosen shape.