
Preview and navigation
Use the Preview to inspect your image up close, check seams or look at individual channels. Changing the view does not resize the document.
The preview footer holds controls for quality, live texture updates, post-processing, UV overlays, guides and channel viewing. It also contains HDR, the color-input mode, and hints for the active tool.
Mesh UV overlay
Enable UV in the footer and assign a Mesh to see its UV island outlines over the image. The UV panel lets you choose the channel, submesh, line color and opacity. The outlines follow zoom, pan and view rotation and never appear in exports. To paint a specific part of the model, use UV Island selection.
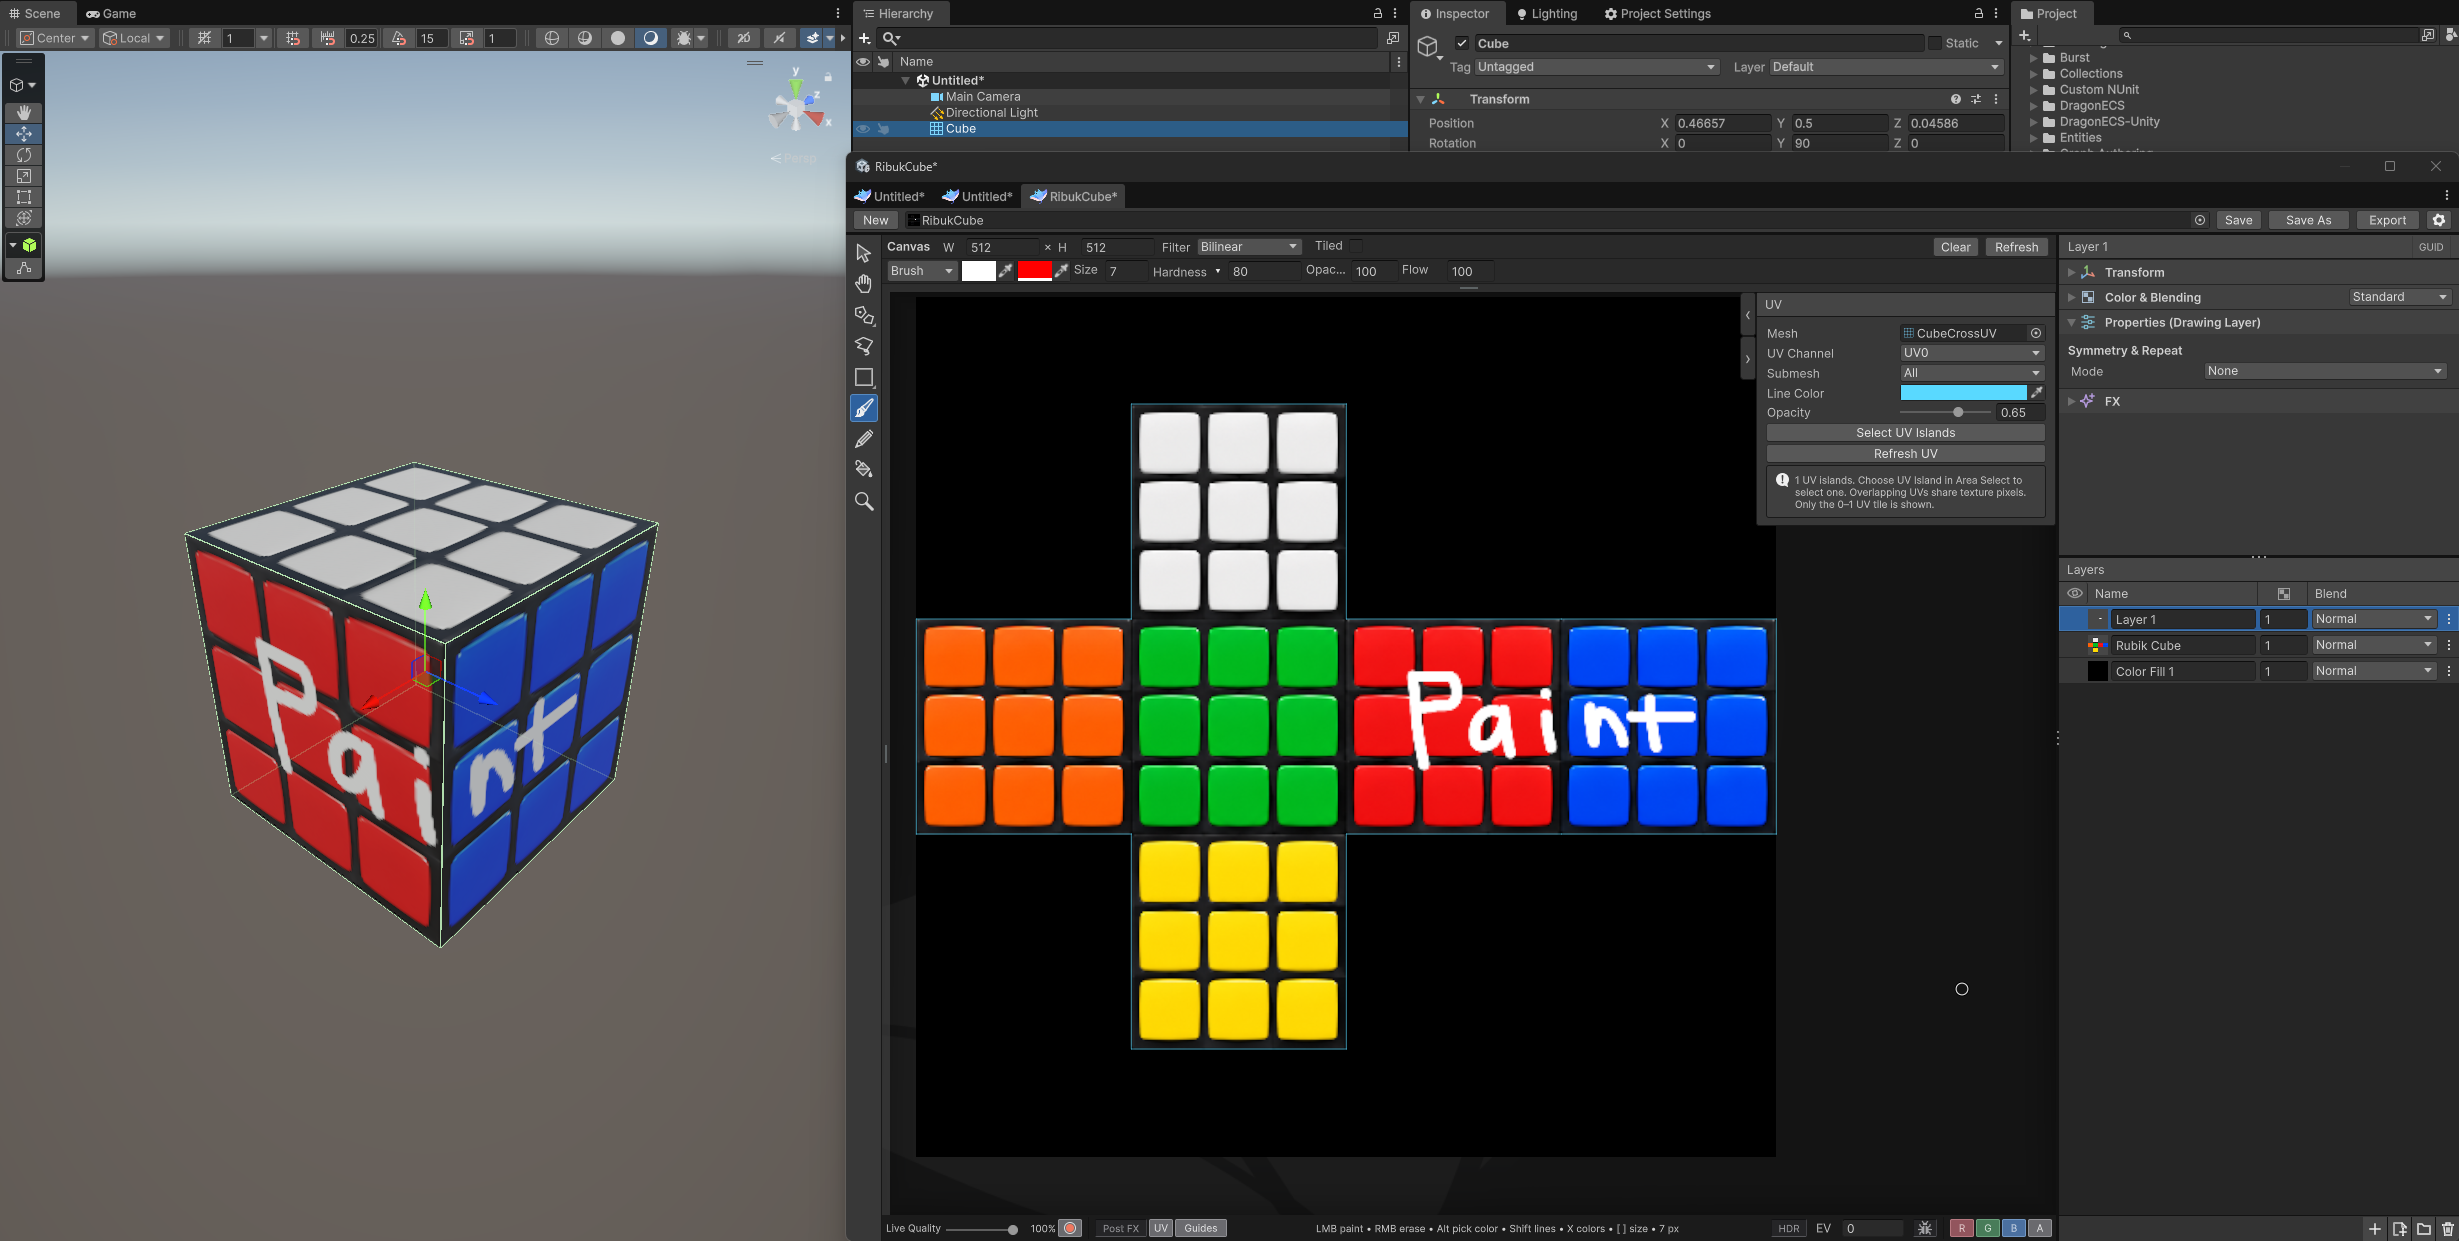
Use the UV outlines to place details on the right faces. With Live Update enabled, you can see brush edits on the model in Scene view as you paint.
Image filtering
Canvas → Filter selects the final image’s filtering: Point keeps pixels crisp, Bilinear smooths pixel transitions, and Trilinear also blends mip levels when available. This does not enable mipmaps. The setting is saved with the document and applies to its output texture, Live Update and images exported into project Assets. PNG/JPEG/EXR files themselves do not store a sampling mode for other applications. Pencil always shows the preview with Point filtering at full quality, without changing this setting.
Move around
- Hold the mouse wheel and drag to pan.
- Hold
Shiftand drag with the mouse wheel pressed to rotate the view with any tool. Rotation lightly snaps to 90° steps and to angles that make a guide horizontal or vertical on screen. The closest angle wins; holdCtrlto bypass snapping. Hidden guides and guides with Snap to Guides turned off do not add magnetic angles. - Scroll to zoom around the pointer with any tool.
- With Zoom (
Z), click to zoom in,Alt-click to zoom out, or drag a rectangle around the area you want to inspect. - Fit shows the whole canvas upright; 100% is useful for checking pixel detail.
- Enter a precise percentage in Zoom %, then press Enter or leave the field. The center of the view and its rotation stay in place.
- Enter an exact angle in Zoom → Angle ° and press Enter (or leave the field) to apply it without snapping. 0° resets rotation without changing zoom or pan.
View rotation does not rotate the layers or affect saving and export.
Tiled is a toggle button in the preview footer, beside UV and Guides. Enable it to see repeated copies and work across the edges: painting, erasing, filling and selections wrap to the opposite side. The saved image size and layer transforms remain unchanged. See seamless painting.
Guides
Drag from the thin strip on the left of Preview to create a vertical guide, or from the top strip for a horizontal one. The new line is parallel to the strip even on a rotated canvas; afterwards it moves, zooms and rotates with the canvas.
Guides that are horizontal or vertical in the current preview appear bright cyan; angled guides use a softer blue-gray. The colors update as you rotate the view, without changing snapping.
In User Settings → Guides & Snapping, choose colors for Aligned Guides, Angled Guides and the Active Guide (hovered, selected or dragged). A guide about to be deleted stays red. Snap Radius (px) sets the attraction distance for guides, intersections, canvas edges and pivot anchors: 1–64 UI pixels, default 8, independent of zoom. Angular snapping is unchanged. These preferences apply across windows and are saved between sessions; Reset Guides & Snapping restores their defaults.
Drag an existing line to reposition it. Drop it back on either strip or outside Preview to remove it; Esc cancels the drag.
You can create guides from the edge strips with any tool. Only Zoom, Transform and Layer Select can grab existing lines to move or drag-delete them. Painting, filling and area-selection tools ignore existing guides; the lines stay visible.
Click a guide to select it: arrow keys nudge it, Shift increases the step tenfold, and Delete removes it. Click elsewhere or press Esc to deselect. Double-click a guide to enter an exact Position (px) and Angle (°). Angles are relative to the canvas: 0° is horizontal, 90° is vertical. For those two orientations, Position is the distance from the top or left edge; at other angles it is the signed perpendicular distance from the top-left corner.
Right-click a guide to Edit, Duplicate or Delete it. Right-click either edge strip for the shared controls:
- Show Guides — hide or show the lines. The Guides button next to UV in the preview footer does the same. Hidden guides do not attract tools; creating a new guide shows them again.
- Lock Guides — protect existing lines from editing. You can still create new guides and snap tools to locked ones.
- Snap to Guides — toggle snapping; hold
Ctrlto bypass it temporarily.Ctrlalso lets Zoom and Transform grab through an existing line. - Undo Guide Change / Redo Guide Change — undo or redo guide edits without affecting painting.
- Clear Guides — remove all guides.
Moving or resizing a layer (including a Shader FX Transform 2D area) snaps its edges to parallel guides. Moving also snaps its center lines. Edges ignore oblique guides; rotating a transform can align it parallel or perpendicular to a guide. Shift retains its usual rotation and resize constraints.
Nearby guide intersections take priority over individual lines, with the same snap radius regardless of zoom. They attract the brush/pencil center, selection and shape points, the pivot, and a transform’s center, corners and edge midpoints. When movement is constrained, only intersections on the allowed path attract the point. Holding Ctrl bypasses snapping.
The pivot and polygonal lasso vertices can also snap to a single guide at any angle. Rectangle selection snaps to individual lines only when they are parallel to the canvas axes; intersections work at any angle.
Brush and Pencil also snap their stroke center to guides at any angle and to intersections, including while erasing. The cursor shows the snapped position. If you start a stroke snapped to a guide, holding Shift keeps it on that same line no matter how far the pointer moves away. Release Shift for ordinary nearby snapping; press it again during the same stroke to return to the original guide. At an intersection, the guide closest to the starting pointer is used. If you start away from guides, Shift keeps its usual horizontal or vertical screen direction. Hold Ctrl to bypass guide snapping and locking. Pencil strokes still follow the pixel grid; brush Scatter is applied after snapping the stroke path.
Dragging a guide snaps it to parallel canvas edges, the canvas center, and the selected layer’s parallel edges and center lines, but not to other guides. It can also snap to guide intersections, unless a guide parallel to the dragged one passes through that intersection. Hold Ctrl for free placement.
Guides are not exported and are cleared when switching documents.
Balance detail and responsiveness
Live Quality defaults to 100%. Your manually chosen value is remembered. Lower it in the footer if painting on a large image feels slow. Save and export still use full resolution.
See your paint on a model
- Save the document and assign its texture to your model’s material.
- Turn on Live Update (the circle button) in the preview footer, next to Post FX.
- Paint or adjust layers: objects using that texture update in Scene View.
The white lettering crosses two faces in the texture; Live Update lets you check how it wraps around the cube while painting.
The material keeps its texture reference when you toggle Live Update or close WhimTex.
Turning it off or closing without saving restores the last saved image. Press Save or Ctrl+S
to keep your edits; Save As creates a different asset and does not redirect existing materials.
Live Update shows the composition without EV, channel-display masks, Debug or preview Post FX. While editing it uses preview quality, then refines the result when you stop. If you resize the canvas, the live image fits the saved texture size until you save again. Live Update starts off when you open the window and turns off when you switch documents or reload scripts.
Use a compositor inside another document
Assign the saved document’s output texture to a File layer in another document. Saving the source refreshes the receiving window automatically. To see changes while editing, enable Live Update in the source window. The receiving window does not need Live Update enabled just to display them. Turning Live Update off restores the saved image in the receiving window too.
For a chain of documents, enable Live Update in each intermediate window that should pass its updated result onwards. Save As creates a new asset; existing File layers keep referencing the original. Automatic refresh across cyclic links, such as A using B while B uses A, is disabled to prevent feedback loops.
Check brightness and channels
EV changes the viewing exposure, not the image itself. Keep it at 0 for the normal view. If white looks gray or colors look overexposed, check this field first.
R / G / B / A lets you inspect the color channels or transparency separately. See color and channels for the display modes.
Channel buttons also affect new paint: disabled color channels receive zero, and turning off A prevents Brush, Pencil and Fill from leaving a mark. Turn all four channels on for ordinary painting.
Background and problem pixels
Change the transparency checkerboard’s colors and size in Window tab ⋮ → User Settings….
The bug button highlights pixels with invalid color values. Use it to investigate a broken-looking effect; its highlight color is also in User Settings. The overlay is not included in saved images.
Zoom, EV and Post FX change only the view. Tiled also affects painting by wrapping strokes across canvas edges.